Illustration & Visual Narrative / Bachelors of Design (Honors) in Creative Media
Task 4: Webcomic
JUMPLINKS
LECTURES
On week 11, Mr. Hafiz gave us a brief explanation on what we have to do for our final project. While week 12 introduced us to basic transitions and elements on comics.
 |
| Fig. 1.1, Scott McClouds Transitions, (05/12/24) |
INSTRUCTIONS
TASK
Comic
1. Sketches & References
The first thing we have to do is to read The Monkey's Paw short story and choose which part of the story to turn into a comic. After some time of thinking, I chose this part of the story.
"Well, it's just a bit of what you might call magic, perhaps." said the Sergeant-Major offhandedly.
His three listeners leaned forward eagerly. The visitor absentmindedly put his empty glass to his lips and then set it down again. His host filled it for him again.
"To look at," said the Sergeant-Major, fumbling in his pocket, "it's just an ordinary little paw, dried to a mummy."
He took something out of his pocket and proffered it. Mrs. White drew back with a grimace, but her son, taking it, examined it curiously.
"And what is there special about it?" inquired Mr. White as he took it from his son, and having examined it, placed it upon the table.w
"It had a spell put on it by an old Fakir," said the Sergeant-Major, "a very holy man."
Next, I started looking for references on google and Pinterest for the color palette, shading, and art style for my comic.
.png) |
| Fig. 3.1, References & Moodboard, (06/12/24) |
Then, I proceed to sketch out a rough sketch of the comic on my tablet consists of 7 panels.
 |
| Fig. 3.2, Sketch, (18/12/24) |
.2. Digitization
I went to Illustrator to work on the comic but first, I made rectangles on top of the sketch and redraw the sketch and added a close-up panel.
 |
| Fig. 3.3, Traced sketch, (21/12/24) |
Then, I colored the panels with the pen tool and blob brush tool. I separate the layers per panel to make it easier to coordinate.
.png) |
| Fig. 3.4, Coloring process, (22/12/24) |
.png) |
| Fig. 3.4, Comic page without background, (22/12/24) |
After working on the coloring, I took a photo of my apartment for the background of some of my panels. Then, I went to Photoshop to add a noise filter and threshold on the background to create a surreal effect.
.png) |
| Fig. 3.5, Add backgrounds, (22/12/24) |
Here is the final result:
 |
| Fig. 3.6, Final comic page, (22/12/24) |
Comic Page Animation
1. Animation
For the animation, I tried to animate 3 panels of my comic which is panel 2, 3, and 5.
.png) |
| Fig. 3.7, Selected panels for animation, (01/01/25) |
On panel 2, I tried making the gleam on his glasses move up and down.
.png) |
| Fig. 3.8, Panel 2 animation frames, (01/01/25) |
I decided to animate the sergeant's drink on the third panel.
.png) |
| Fig. 3.9, Panel 3 animation frames, (01/01/25) |
Lastly, I made the sergeant blink on panel 6, as if he was trying to clear his mind before showing the monkey's paw
.png) |
| Fig. 3.10, Panel 6 animation frames, (01/01/25) |
This is the final animation.
 |
| Fig. 3.11, Final comic animation, (01/01/25) |
1. Sketches & References
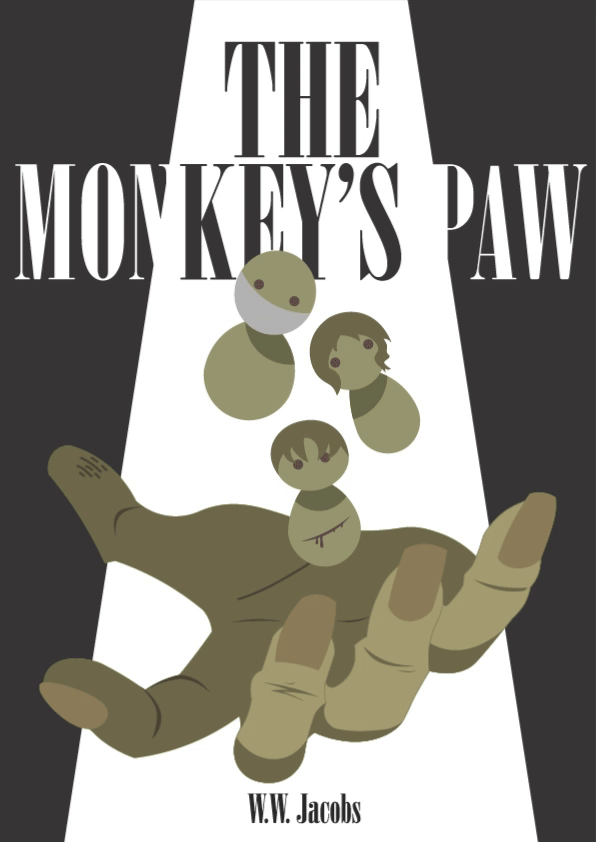
When I was making the sketches for the cover, I thought of a few concepts. Here are some of the sketches I came up with.
.png) |
| Fig. 3.12, Book cover sketches, (18/12/24) |
I decided to use the fourth sketch I made as the cover. To begin, I traced out the shape of the palm using a pen tool. Then, I made the fingers and the nails with pen tool as well. Then, I added minor details onto the hand to detail the hand features.
.png) |
| Fig. 3.13, Hand illustration process, (19/12/24) |
.png) |
| Fig. 3.14, Figures on the palm, (19/12/24) |
 |
| Fig. 3.15, Finalized book cover, (19/12/24) |
Book Cover Animation
For additional marks, I made a simple animation of the cover on Adobe After Effects. I tried to make the dolls on top of the paw hovering up and down.
First, I need to import the AI file to the software. I also made folders to make it easier to arrange.
 |
| Fig. 3.16, Importing AI file, (04/01/25) |
 |
| Fig. 3.17, Keyframes, (04/01/25) |
Lastly, I adjusted their movement speed using the graph editor separately to create a seamless and smoother movement.
 |
| Fig. 3.18, Graph editor, (04/01/25) |
 |
| Fig. 3.19, Final book cover animation, (04/01/25) |
RATIONALE

Fig. 3.16, Rationale board 1, (04/01/25)

Fig. 3.17, Rationale board 2, (04/01/25)
RATIONALE
 |
| Fig. 3.16, Rationale board 1, (04/01/25) |
 |
| Fig. 3.17, Rationale board 2, (04/01/25) |
REFLECTIONS
The last project of this module is by far the most exhausting project I have ever worked on. Mainly because we have to draw a book cover and a comic page, also animating the panels. I have been a huge fan of comics since I was in middle school, so working on the comic is somewhat fun, even when it's tiring. But, it also made me realize that composition and the flow of the comic is important, especially the panelling. I also learned some new tools on Illustrator like the blob brush, which allows you to draw multiple strokes on one path. Working on the cover I would say took the most time since I changed a lot of the illustration and composition of the cover until I am satisfied with the result. I have done animation on Photoshop before, so I would say it was pretty okay.
Overall, I think this assignment have made me learn and understand a lot of aspects about comics and it was a great learning experience for me. It was fun to work on and I am actually satisfied with what I have worked on.
Comments
Post a Comment