Illustration & Visual Narrative / Bachelors of Design (Honors) in Creative Media
Task 3: Illustrated Typography Poster
JUMPLINKS
LECTURES
This week, Mr. Hafiz taught us how to make a text intertwining with an object, apply texture and give a 3D effect to it.
 |
| Fig. 1.1, Applying intertwine, (07/11/24) |
INSTRUCTIONS
TASK
Week 8
1. Sketches & References
To begin, I searched for some references and sketches for the design of the poster I am going to work on.
 |
| Fig. 3.1, Moodboards, (11/11/24) |
After that, I started sketching on my tablet. I made two sketches and after receiving feedbacks from Mr. Hafiz, I made a new layout.
 |
| Fig. 3.2, Sketch 1, 2, and 3, (11/11/24) |
Week 9
2. Digitalization (Typography)For the typography, I did all of the work only using Illustrator. I started by typing the quotes out with the fonts I have downloaded online.
 |
| Fig. 3.3, The quote, (20/11/24) |
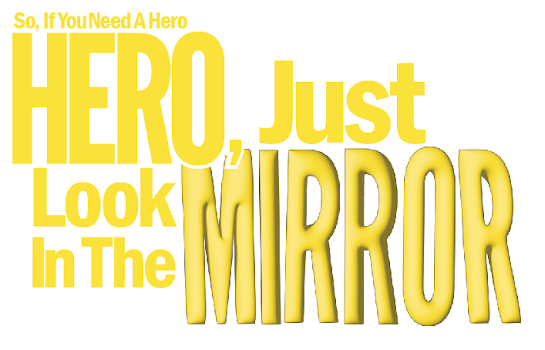
Next, I used a 3D effect to emphasize the word "mirror."
 |
| Fig. 3.4, Applying 3D effect, (20/11/24) |
.png) |
| Fig. 3.5, 3D effects, (20/11/24) |
For the final touch, I rotated the mirror to give it a fun look.
 |
| Fig. 3.6, The quote with 3D effects, (20/11/24) |
Week 10
3. The PosterThe final step is to work on the poster. Since the poster relies heavily on photographic elements, I will put the process on Week 9-10 DPI E-portfolio.
 |
| Fig. 3.6, Finalized Poster Design, (25/11/24) |
REFLECTIONS
Working on this poster was quite a challenge for me. From gathering ideas, finding composition, and to make all of the parts work is rather confusing. What I get from this task is how effects and filters can change a meaning of a text and its general vibe. So, I decided to go with a simpler color to make the poster stand out and pop. Overall, I feel this task has made me learn a lot of the components on Illustrator, starting from the 3d effects, intertwine and layering textures lectures.
.png)
Comments
Post a Comment